Shape Transformation with Clay Animation
के द्वारा योगदान डेविड डेलग्रासो तथा लेह वेल्स
![]()
Description
Building on knowledge of three-dimensional shapes, students will practice basic clay molding and transformation techniques in animation. This activity assumes very basic knowledge of animation, but could easily be adapted for brand-new animators.
दिशा-निर्देश
- Give small groups the challenge of creating a sequence of clay transformations.
- Each group chooses two simple geometric shapes.
- Each group chooses which shape will be the starting, middle, and ending shape.
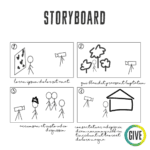
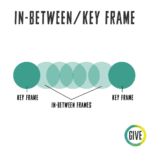
- On a five-panel storyboard (Students can draw five large frames on a blank sheet of paper or be given a printed template.), students will draw their first, middle, and final shape in frames one, three, and five. These will become key frames in the animation. They should consider placement of the object in the frame.

- In panels two and four, students will draw key frames for the transition. For example, if the first shape is a cone and the second shape is a cube, this key frame could look like a cone whose top has fallen over. Note: Students can take this further by animating more complex transition shapes or animating movement in the scene in addition to transformation. For example, the cube could rotate as it transforms.

- Once students have finished their storyboarding and decided on the starting roles in their small group, they can begin molding their first 3D shape, and then animating the shape.
- Check in with small groups to review playback with them and remind them to rotate roles.
- In panels two and four, students will draw key frames for the transition. For example, if the first shape is a cone and the second shape is a cube, this key frame could look like a cone whose top has fallen over. Note: Students can take this further by animating more complex transition shapes or animating movement in the scene in addition to transformation. For example, the cube could rotate as it transforms.
- Students in each group should rotate roles to
- operate the camera;
- operate the laptop, run playback for continuity and smoothness of animation;
- manage the transformation of the clay between each frame.
- Reflection: Students should reflect on the following questions:
- How did you decide to transform your shapes, and how did that change the animation?
- What other shapes or movements would you add if you were doing this again?
गतिविधि में संक्रमण
Play an example animation video to begin, and have the group process some of what they saw.
गतिविधि से बाहर संक्रमण
To close out before moving on to the next activity, each group can share what they created with the whole class and share a flower and a seed (highlight and idea for the future).
कक्षा व्यवस्था
Small groups in pods.
समर्थन/अनुकूली सामग्री/उपकरण
- Before beginning, groups should have a basic storyboard for their animation. To help support role rotation, students could write down who will animate each shape/frame sequence. (This can change, but everyone should have a turn.)
- Provide pre-molded shapes for students with limited dexterity. Students may then be able to move the pre-molded objects around.
- Work the clay a little before class to get it warmed up and easier to manipulate. Students and teachers can also help with this.
- Consider providing different material options. Some clays or clay-like products are harder to manipulate than others.
- Provide pre-drawn storyboards for students to use directly or modify.
- Use a visual and/or auditory timer to remind students to rotate.
Possible Roles for Classroom Professionals
- व्यक्तिगत छात्रों का समर्थन करें।
- समूहों में भाग लें।
- यदि आवश्यक हो तो छात्रों को मिट्टी में हेरफेर करने में मदद करें।
- Help groups with the pictures/filming portion of the activity if needed.
- Circulate and review playback with students. (Is the transformation smooth and believable?)
Adjustments for Remote Instruction
![]()
If it is possible to provide students with art supplies at the beginning of a residency, by mail for example, you can provide students with clay so that students can create individual Claymation videos. If this is not available, you might lead an activity to create stop-motion animation using objects other than clay. For example, students might make shapes from paper, toys, or other household objects.

